Do you want to use WebP images in WordPress?
WebP Images is a modern image format that offers better image compression by reducing the file size. This makes your website load faster and saves bandwidth.
In this article, I will show you how to use WebP images easily in WordPress.

What is WebP & Why Use WebP Images in WordPress?
WebP is a new file format for images to be used on the web. By using the WebP image format, your images will be 25-34% smaller than PNG and JPEG without any loss of quality.
If images slow down your website, converting them to the WebP format can improve your page load speed test score.
To learn more about image compression, see My guide on how to optimize images for the web.
[amp-cta id=’73465′]

Because WebP is a new file format, it is not supported by all browsers. However, most modern browsers such as Google Chrome, Firefox, and Microsoft Edge support WebP images.

Should you use WebP images in WordPress?
WebP images can help you speed up your WordPress site. These are recommended best practices for use in conjunction with WordPress caching plugins, CDNs, and more.
By default, WordPress does not support WebP images and uploading WebP images will display an error.

To fix this, you will need to use an image compression plugin to convert the image to the WebP image format. You will still be uploading your images in file formats supported by WordPress such as PNG, JPEG, and GIF, so they can be used as backups.

ALSO READ : What is Lead Generation? Importance and Purpose in Digital Marketing
If your site uses a lot of images, and it slows down your WordPress blog, then you should consider using WebP images.
Here’s how to use WebP images in WordPress. I’m going to show you a few methods, so you can choose the one that suits you the most:
- Using WebP Images in WordPress with the EWWW Optimizer
- Using WebP Images in WordPress with WP Rocket
- Using WebP Images in WordPress with SG Optimizer
Method 1. Using WebP Images in WordPress with EWWW Optimizer
EWWW Image Optimizer Plugin is one of the best WordPress image compression plugins that allows you to optimize your WordPress images. It also supports WebP Images and can automatically display them in supported browsers.
The first thing you need to do is install and activate the EWWW Image Optimizer plugin. For more details, see my step by step guide on how to install a WordPress plugin.
Upon activation, go to Settings »EWWW Image Optimizer page to configure plugin options. You will be greeted by the setup wizard, but you can click the ‘I know what I’m doing’ link to exit the wizard.

On the next screen, you will see many plugin options. Scroll down and check the box next to the ‘WebP Conversion’ option.

After that, click on the Save Changes button to store your settings.
Next, you need to scroll down to the WebP Conversion section. The plugin will now show you some rewrite rules with a red preview image.
You need to click on the ‘Insert Rewrite Rules’ button, and the plugin will automatically try to insert these rewrite rules into your .htaccess file.

If the plugin succeeds in adding the rule, the red image preview will turn green with the text ‘WebP’.

Sometimes, plugins may not be able to enter rules. If so, you will need to copy the rewrite rules from the plugin’s settings page and paste them at the bottom of your .htaccess file manually.
Once you are done, return to the plugin’s settings page and click the Save Changes button again. If the preview image turns green, it means that you have successfully enabled WebP image submission on your WordPress site.
Alternatively, you can choose from the JS WebP Rewrite method or the WebP Rewrite method as your WebP submission option. It’s a little slower than the .htaccess method, but will get the job done.
Bulk Convert your Old Image to WebP Version
EWWW Image Optimizer lets you easily convert previously uploaded image files to WebP images. Just head over to the Media »Library page and switch to list view.

Next, you need to click the Screen Options button and change the ‘Number of items per page’ to 999. If you have 1000+ images, that image will appear on the next page.
This way you will be able to quickly select a large number of images for bulk optimization. Next, click on the Select All checkbox at the top to select all images.

After that, click the Bulk Actions drop-down menu and select the Bulk Actions option. Finally, click the Apply button.
On the next screen, the plugin will give you the option to skip image compression and just convert it to WebP. You can check this option if your image is already optimized.

After that, click on the ‘Scan for Unoptimized Images’ button to continue. The plugin will then show you the number of images found, so you can click the Optimize button to continue.
Your image will now be optimized, and the EWWW optimizer will generate a WebP version of your image.

Menguji Pengiriman Gambar WebP kamu
Setelah kamu mengoptimalkan gambar kamu, kamu dapat pergi ke posting blog atau halaman yang berisi beberapa gambar. Arahkan mouse ke gambar mana pun dan klik kanan untuk membuka gambar di tab baru.
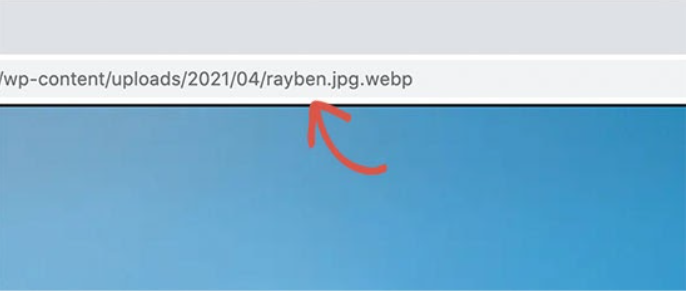
This will open the image in a new browser tab, and you will be able to see that it has a .webp extension in the address bar.
If the plugin cannot display webp images, you can return to the plugin’s settings page. From here, you can change your WebP submission option to the ‘JS WebP Rewriting’ or ‘ WebP Rewriting’ method.
Method 2. Using WebP Images in WordPress with Imagify
Imagify is a WordPress image optimization plugin made by the people behind WP Rocket, the best WordPress caching plugin. It allows you to easily optimize and convert images to the WebP image format.
The first thing you need to do is install and activate the Imagify plugin. For more details, see my step by step guide on how to install a WordPress plugin.
Upon activation, you will need to visit the Settings »Imagify page to configure the plugin settings. From here. click on the ‘Generate Free API Key’ button to continue.

You will be asked to enter your business email address after which you can check your inbox for an email containing your API key. Copy and paste the key on plugin’s settings page and click on the Save Changes button.
ALSO READ : How to Testing Facebook Ads and Getting Optimal Results
Next, you need to scroll down to the Optimization section. There you need to check the options beside the ‘Create webp versions of images’ and ‘Display images in webp format on the site’ options.

Below that, you can choose from two submission methods to display WebP images in WordPress. The first is the .htaccess method, and the second is by using the tag.
The .htaccess method is faster, but doesn’t work if you are using a CDN service. The tag method also works with CDNs, but it can break some WordPress themes.
You can choose the one that works well for your site. After that, click on the ‘Save & go to bulk optimizer’ button at the bottom.

This will take you to the Media »Bulk Optimization page. The plugin will automatically start optimizing all your WordPress images in the background.

If you have a lot of pictures, it might take a while. Don’t worry, you can close the page and come back later because closing the page won’t stop the image optimization process.
Testing your WebP images in WordPress
After the optimization is complete, you can visit a page or post that contains multiple images. Hover your mouse over the image, then right click to select ‘Open image in new tab’.
This will open the image in a new browser tab, and you will be able to see the .webp extension in the address bar.

Method 3. Using WebP Images in WordPress with SG Optimizer
This method is recommended if you are a SiteGround user.
SiteGround is one of the best WordPress hosting companies. They offer a free SG Optimizer plugin for their users which allows you to optimize the performance of your WordPress. It also includes options for optimizing WordPress images.
First, you need to install and activate the SG Optimizer plugin.
Upon activation, the plugin will add a new menu item to your admin sidebar labeled ‘SG Optimizer’. Clicking on it will take you to the plugin’s settings page.

From here you can enable cache settings if you wish to use SiteGround’s built-in cache system.
After that, you can switch to the Media Optimization tab and enable the ‘Generate WebP Copies of New Images’ option.

Below that, you will see an option for ‘Bulk Generate WebP Files’. Clicking on it will start generating WebP copies for all image files in your WordPress media library.

Once done, your WordPress site will start displaying WebP images.
Testing WebP Images in SG Optimizer
To see if your website serves WebP images, you need to open a page on your site with a few images.
After that right click and select Inspect tool. This will open the developer console where you need to switch to the Network tab.

From here, click on the ‘img’ tab then reload the page (CTRL + R on Windows and Command + R on Mac). When your website is reloaded, you will see all the images loaded in the developer console.